Relocating a piano can be challenging due to its weight, size, and delicate components. Here’s what you need to know for a safe move:
- Piano Types & Weight: Upright pianos weigh 200–600 lbs; grand pianos range from 400–1,200 lbs. Measure dimensions and identify the type to plan effectively.
- Preparation: Measure doorways, hallways, and stairs. Clear the path, remove obstacles, and secure doors open.
- Supplies: Use heavy-duty moving blankets, straps, piano dollies, and floor protection materials.
- Teamwork: At least 4–6 people are needed, depending on the piano type. Clear communication and proper lifting techniques are essential.
- Transport: Use a climate-controlled truck, pad the piano securely, and anchor it with heavy-duty straps.
- After the Move: Inspect for damage, let it acclimate for 2–3 weeks, and schedule a professional tuning.
Moving a piano is complex, but with the right preparation and tools, you can ensure it arrives safely. Consider hiring professional movers for added expertise and peace of mind.
Assessing the Piano and Preparing for the Move
Before moving a piano, it’s crucial to evaluate the instrument and plan thoroughly. This step ensures the safety of both the piano and the people involved in the move. From determining the piano type to measuring doorways, every detail matters.
Evaluating the Piano Type and Size
Start by identifying the type of piano you’re moving, as each comes with its own challenges. Grand pianos (or horizontal pianos) are about 5 feet wide and demand special attention due to their unique shape and uneven weight distribution. Upright pianos (also called vertical pianos) are generally easier to move but still require care because of their height and concentrated weight.
For upright pianos, height is the key measurement. Measure from the floor to the top of the lid to get an accurate reading. Here’s a quick breakdown of upright piano types and their typical dimensions:
| Piano Type | Height/Length | Weight Range |
|---|---|---|
| Spinet | About 38 inches | 200-300 lbs |
| Console | 40-45 inches | 350-450 lbs |
| Studio | 44-48 inches | 400-500 lbs |
| Upright | 50-60 inches | 480-600 lbs |
For grand pianos, measure the length from the keyboard to the furthest curve. This is important to determine if the piano can navigate doorways and corners. Grand piano types and their weights are outlined below:
| Piano Type | Length | Weight Range |
|---|---|---|
| Petite Grand | 4 ft. 5 in. – 4 ft. 10 in. | 400-500 lbs |
| Baby Grand | 4 ft. 11 in. – 5 ft. 11 in. | 540-1,100 lbs |
| Medium Grand | About 5 ft. 7 in. | 500-600 lbs |
| Concert Grand | About 9 ft. | 700-1,200 lbs |
Additionally, knowing the brand and model can be helpful. Some manufacturers, such as Bluthner, Bosendorfer, Chickering, Mason Hamlin, and Petrof, produce heavier pianos, which may require extra manpower or equipment.
Once you’ve assessed the piano, the next step is to measure and prepare the moving environment.
Measuring Doorways, Hallways, and Staircases
Accurate measurements of the moving path are essential. Start with all doorways, hallways, and staircases to ensure the piano can pass through safely. Don’t overlook door frames or other protrusions.
Staircases need special attention. Measure the narrowest vertical point, from the ceiling corner to the top of the closest stair. Then, measure from the same ceiling corner to the next stair to check vertical clearance at different points. For width, measure wall-to-wall, or from the wall to the handrail if the latter cannot be removed.
Turns along staircases or hallways can be tricky. Pay attention to landings, corners, and adjacent walls that might limit maneuverability. If you’re using an elevator, measure the interior height and door opening dimensions to confirm the piano will fit.
After completing these measurements, double-check that your piano’s dimensions align with the available space.
Clearing the Moving Path
Once measurements are confirmed, clear the route to ensure a smooth move. Plan the path from the piano’s current location to the moving truck, removing anything that could obstruct the way. This includes:
- Area rugs
- Electrical cords
- Small furniture
- Decorative items
Inspect the path for slippery or wet areas, such as freshly mopped floors or damp outdoor surfaces, and address these hazards before moving day. If necessary, remove doors from their hinges to create extra clearance. Secure any remaining doors so they stay open during the move.
With a clear route in place, you’re ready to gather the necessary supplies.
Gathering Moving Supplies
Proper equipment is essential for a safe piano move. Start with heavy-duty moving blankets to protect the piano and surrounding surfaces. Standard household blankets won’t provide enough cushioning. Use floor protection materials like cardboard or plastic sheeting to prevent damage to floors.
Other must-have supplies include:
- Moving straps and rope: Use heavy-duty straps designed for the piano’s weight to secure it during lifting and transport.
- Piano dolly or furniture dolly: Upright pianos work well with a four-wheel dolly, while grand pianos may need a specialized piano board.
- Basic tools: Keep screwdrivers handy for removing parts if needed, gloves for a secure grip, and a measuring tape for last-minute checks.
Preparation is key to avoiding accidents or rushed decisions. Whether you’re tackling a residential move or an apartment move, this groundwork ensures a smoother process.
Protecting the Piano and Surroundings
Once you’ve gathered the necessary moving supplies, the next step is to safeguard both your piano and your home. This step requires careful preparation and the right materials to avoid damage during the move.
Wrapping and Securing the Piano
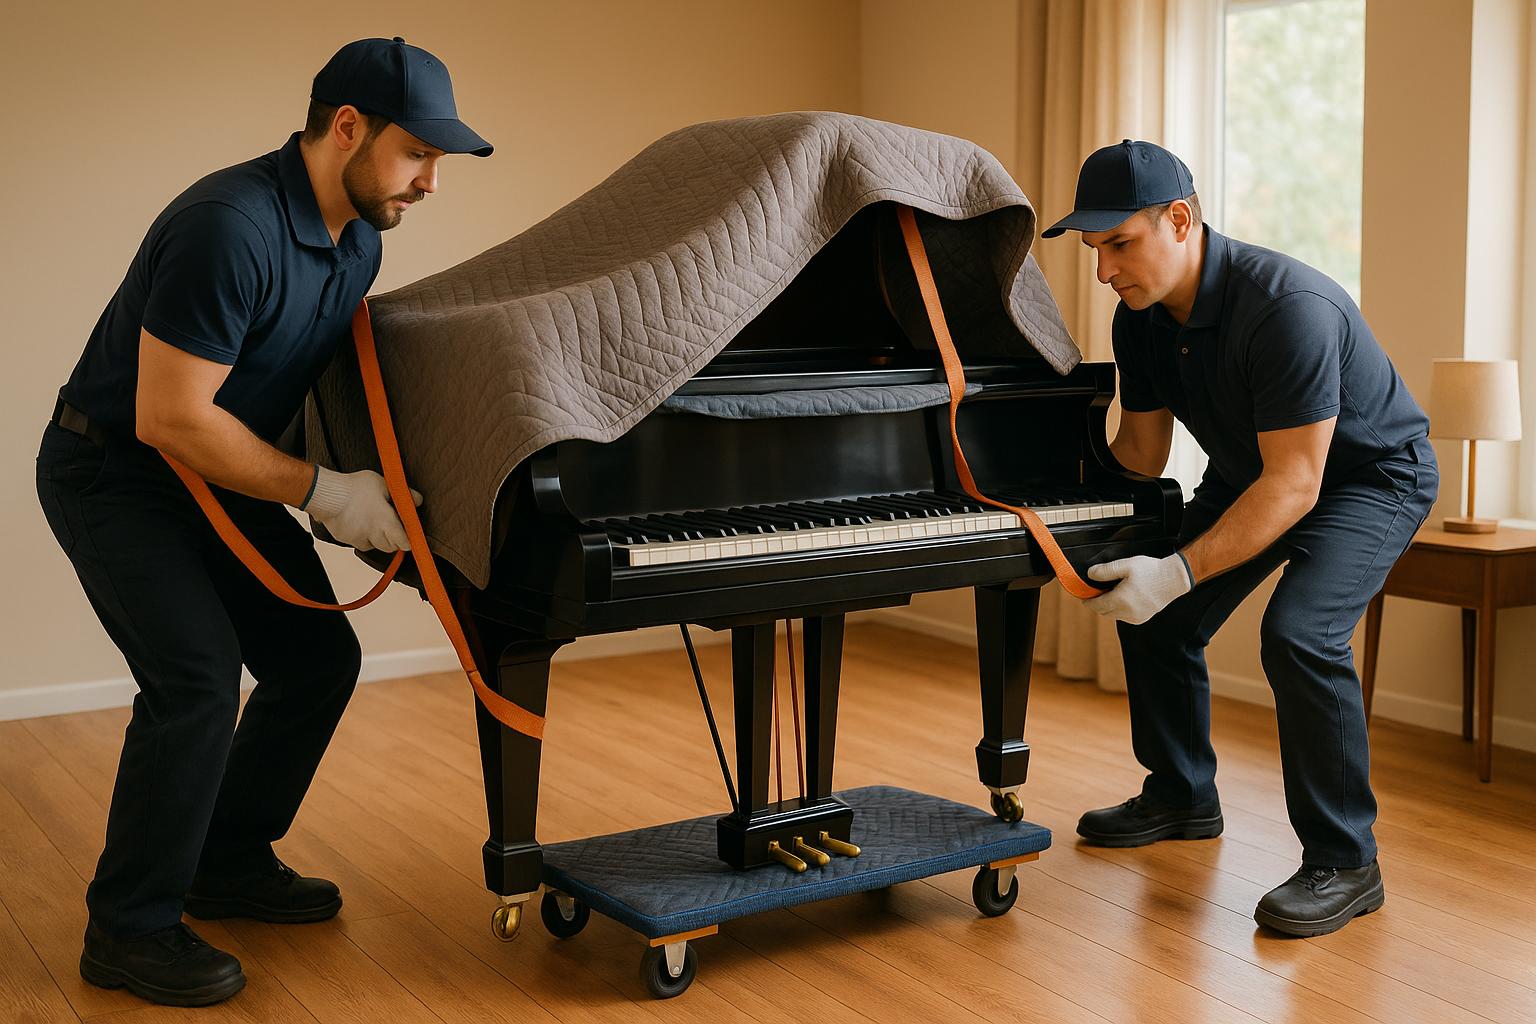
Start by cleaning the piano with a soft cloth and documenting any pre-existing marks or scratches. For upright pianos, secure the keyboard lid and wrap the pedals in bubble wrap. For grand pianos, the process is a bit more involved: remove the legs, safely store all hardware, use a skid board for the lid, and position the piano on its side, ensuring all contact points are padded.
Wrap the entire piano with heavy-duty moving blankets, securing them firmly with furniture straps. Finish the process by applying professional-grade shrink wrap to seal the protective layers in place.
Once the piano is fully protected, turn your attention to safeguarding your home’s surfaces.
Protecting Walls, Floors, and Corners
Your walls, floors, and corners are just as vulnerable as the piano during a move. Moving blankets can protect not only the instrument but also walls from dents and scuffs. To prevent scratches, lay down protective materials like drop cloths, cardboard, plastic floor runners, or non-slip mats along the pathways where the piano will be moved.
For added protection, use foam corner guards or painter’s tape on wall edges, especially in tight spaces like doorways and hallway corners where accidental contact is more likely.
Using Ramps and Stair Pads for Multi-Level Moves
If your move involves stairs or multiple levels, additional preparation is key. Ramps make it safer to move a piano up or down staircases. Consider investing in specialized equipment like ramps, piano boards, and stair rollers to simplify the process.
For doorways with raised jambs, lay a sheet of plywood covered with moving blankets to create a smooth surface for sliding the piano. When navigating stairs, cover them with blankets for protection but leave sections clear to ensure safe footing. Stair rollers can also make the process more manageable.
Clear communication is critical during the move. Assign one person to coordinate the team’s movements to ensure everyone stays on the same page.
"It is therefore critical that the right type of equipment is used, and that the equipment is strategically designed to provide superior, professional-grade protection and ease-of-use." – New Haven Moving Equipment
Whether you’re tackling a straightforward move or a more complicated relocation, these steps lay the groundwork for safely transporting your piano.
Safe Lifting and Transport Techniques
Once you’ve prepared thoroughly, using the right lifting and transport methods is crucial to ensure a smooth and safe piano move. This is where many attempts go wrong, so sticking to proven techniques is key for both safety and success.
Assembling a Moving Team
Moving a piano is no small task – it requires strength, coordination, and teamwork. For an upright piano, you’ll need at least four people, while a grand piano might call for six. Make sure everyone involved is physically able to manage the weight and demands of the move.
But it’s not just about brute strength. Moving a piano also demands steady coordination, endurance, and attention to detail. If your team lacks experience, it’s worth considering hiring professional piano movers to handle the process. Professionals bring expertise that can prevent costly mistakes.
Clear communication is critical during the move. Designate one person as the guide – a "quarterback" – who oversees the entire path and gives directions to avoid collisions or unsafe movements . This person should have a clear view of the route and call out obstacles others might miss.
Make sure everyone knows their role and is clear on the moving plan. Having a well-coordinated team not only makes the process safer but also builds a sense of teamwork and shared success. Throughout the move, keeping the piano upright is a top priority.
Keeping the Piano Upright
Keeping the piano upright is essential to protect its internal components. If tilting becomes unavoidable, it’s best to let professionals handle it. Tilting can cause strings to shift or hammers to misalign, potentially leading to costly repairs.
Avoid sudden, jerky movements, especially when the piano is at an angle. Abrupt shifts can damage the internal mechanisms, and the problem might not be immediately visible. Always have at least one person maintaining contact with the piano during the move. This ensures quick control if the piano starts to shift or tip. Once this is managed, the right tools can make the transport much smoother.
Using Moving Equipment Properly
Using the right equipment can mean the difference between a smooth move and a disaster. Essential tools include piano dollies, heavy-duty straps, skid boards, and stair rollers. Each piece has a specific role in ensuring the piano is moved securely.
Piano dollies are designed to roll the piano across flat surfaces, reducing the need for heavy lifting and minimizing physical strain. While upright pianos can often be moved with standard dollies, grand pianos require specialized ones to handle their unique shape and weight distribution. Always lift the piano from its base to avoid structural damage.
Stair rollers are particularly useful for navigating staircases. These tools allow you to slide the piano up or down stairs with controlled effort, making what might seem like an impossible task much more manageable.
"In April 2017, a user on Piano World Piano & Digital Piano Forums discussed moving a Yamaha U1 upright piano through a narrow doorway. Community members suggested that professional piano movers could handle upending the piano to fit it through the doorway, emphasizing the importance of using experienced movers and protecting the piano’s surfaces." (Source: Piano World Piano & Digital Piano Forums, 2017)
If you don’t own this equipment, renting is a smart option. Specialized piano dollies can range from $200 to $999, while motorized stair-climbing dollies can cost up to $2,799. This investment is small compared to the potential costs of damaging your piano – or worse, injuring yourself or others.
sbb-itb-a5538b6
Securing the Piano in the Moving Vehicle
Once you’ve carefully prepared and gathered the right equipment, the next step is choosing a suitable moving truck and ensuring the piano is properly secured inside. Getting it into the truck is only part of the process – how you secure it for the journey is what determines whether it arrives safely or sustains damage along the way.
Choosing the Right Moving Vehicle
For piano transport, an enclosed, climate-controlled truck is the best option. These trucks help maintain a stable environment, which is crucial for preventing the wood from expanding or contracting due to temperature fluctuations. Such changes can affect both the tuning and structural integrity of the instrument. Make sure the truck is spacious enough to avoid cramming the piano. If you’re planning a long-distance move, investing in a climate-controlled vehicle becomes even more critical to protect the piano from environmental changes.
Positioning and Padding the Piano
Inside the truck, place the piano against the back wall. This spot offers better stability and makes it easier to secure the instrument using straps. When loading, position the lighter side (the treble clef side) first, and place the piano on wooden planks to create a stable, level surface flush with the back wall.
Protect the piano by covering it with quilted blankets to prevent scratches. Wrap all parts, including pedals and keys, and add extra padding in areas where the piano might come into contact with the truck walls or other surfaces. Use non-residue tape to keep the padding in place and corner protectors to shield the edges from damage. Adding additional padding around the piano helps absorb vibrations and road shocks during the journey.
Once the piano is positioned and padded, the next step is to secure it with straps.
Anchoring the Piano with Straps
To keep the piano from shifting during transit, use heavy-duty ratchet straps. These straps allow for adjustable tension and provide a secure hold. Position the piano centrally and secure it against the side wall with the straps. Test the setup by applying gentle pressure to make sure the piano stays firmly in place. The straps should be tight enough to prevent movement but not so tight that they risk damaging the piano’s structure.
For extra protection, place additional padding or moving blankets between the straps and the piano to create a cushioned layer. This minimizes the risk of scratches or pressure marks. Lastly, ensure there’s enough space around the piano to keep it isolated from other items in the truck, reducing the chance of accidental contact during the move.
Post-Move Inspection and Care
After moving your piano, it’s crucial to inspect it thoroughly and follow some essential care steps to ensure it stays in top condition.
Inspecting for Damage
Once your piano is set up in its new location, take a close look at it to check for any damage. Start with the exterior – inspect for scratches, dents, or other marks, especially on the legs, pedals, and keys, as these parts are particularly prone to damage during transport.
"After relocating your piano, start with a visual inspection. Carefully check the exterior for any scratches, dents, or other visible damage that may have occurred during the move. Pay close attention to the legs, pedals, and keys, as these parts are particularly vulnerable." – Caitlin Garvey, Allston Piano Moving
Test each key to ensure they’re aligned and functioning properly. Look for chipped or damaged keys. Check the pedals to confirm they’re responding as they should, and inspect for any loose screws, hinges, or veneers that might have shifted.
Perform a quick sound test by playing several notes across the keyboard. Listen for any unusual sounds, like buzzing or rattling, which could point to internal issues. If the piano was disassembled during the move, double-check that all parts have been reassembled correctly. Also, check for any signs of moisture exposure, such as dampness, which could harm the instrument. Lastly, ensure the piano sits evenly on all legs and that the finish looks consistent.
For a more detailed assessment, consider hiring a professional piano technician. They can identify subtle issues that might not be obvious to an untrained eye.
Once you’ve confirmed there’s no visible damage, give your piano time to adjust to its new surroundings.
Allowing the Piano to Acclimate
Pianos are sensitive to their environment, and even small changes can impact their tuning. To keep it performing well, let the piano adjust to its new home before using it regularly.
The wooden parts of a piano need time to adapt to changes in moisture levels. Allow 3–5 days for initial stabilization and wait about 2–3 weeks for full acclimation before scheduling a tuning [45,49]. During this time, avoid placing the piano in direct sunlight or near heating vents, air conditioners, or areas with high humidity, like kitchens or bathrooms.
Keep the room temperature between 68–72°F (20–22°C) and aim for a relative humidity level of 40–45%. A hygrometer can help you monitor these conditions. If needed, use a humidifier or dehumidifier to maintain the right balance. It’s also a good idea to limit playing during the first 48 hours so the piano can settle properly.
Scheduling a Professional Tuning
Once your piano has had time to adjust, it’s time to schedule a professional tuning. Even with careful handling, the vibrations and temperature changes during a move can affect its tuning. Experts recommend waiting at least two weeks after the move before tuning, as tuning too soon might not hold if the piano is still settling [45,50]. Ideally, schedule the tuning within 2–4 weeks post-move.
When selecting a piano technician, look for someone who is a Registered Piano Technician (RPT) and ask for local recommendations. Be aware that some pianos may need more than one tuning session to achieve stable results.
Here’s a general idea of the costs for piano services:
| Service Type | Price Range |
|---|---|
| Initial tuning service | $150–$250 |
| Tuning plus full regulation service | $200–$300 |
| Follow-up tuning adjustments | $75–$150 |
| Advanced repair work (if needed) | $100–$200 per day |
You might also want to discuss adding regulation and voicing services to the tuning. These can help address any mechanical issues that might have come up during the move.
Conclusion
Successfully moving a piano isn’t just about strength – it’s about preparation, precision, and care. With thousands of intricate moving parts, every step matters to ensure your piano remains in top condition.
Key steps include taking precise measurements, securing any loose components, using specialized equipment, and employing proper lifting techniques. Neglecting these can result in damage to delicate internal parts like keys, strings, and hammers, leading to costly repairs and potential safety risks.
It’s also crucial to manage temperature and humidity during transport. Once relocated, giving the piano about two weeks to acclimate helps maintain its structural integrity and sound quality. Afterward, scheduling a professional tuning ensures it sounds as good as it did before the move.
Hiring professional piano movers can make all the difference. They bring the right tools, expertise, and insurance coverage, saving you time, money, and unnecessary stress. By following these steps, you can protect your cherished instrument and enjoy its music for years to come.
If you’re in Charlotte, Charleston, or Greenville, consider reaching out to a local moving company for expert piano moving services tailored to your needs.
FAQs
What are the biggest mistakes people make when moving a piano, and how can you avoid them?
Moving a piano is no small feat, and mistakes can easily lead to damage – or worse, injury. One of the biggest missteps? Underestimating how heavy and bulky a piano really is. Without enough hands on deck or the right equipment, things can go south quickly. Planning ahead and gathering a reliable team to help is a must.
Another common oversight is forgetting to measure doorways, hallways, and other tight spots before the move. Skipping this step can result in frustrating delays or even damage to the piano or your home. Likewise, neglecting to use proper padding and protective materials leaves the piano vulnerable to scratches or dents. And let’s not forget the risk of attempting the move without any prior experience or preparation.
To sidestep these pitfalls, make sure you’re equipped with the right tools, double-check all measurements ahead of time, and, if the task feels overwhelming, don’t hesitate to call in professional movers who know exactly how to handle such a delicate job.
How do I know if I should hire professional movers for my piano or move it myself?
Deciding whether to bring in professional movers for your piano depends on a few key factors, like its size, weight, and how tricky it is to handle. For smaller upright pianos, you might be able to manage with a group of strong helpers and the right equipment. But when it comes to larger instruments, like grand pianos, things get a lot more complicated. Their hefty weight, uneven balance, and awkward shape make them far more challenging – and risky – to move.
Trying to move a piano on your own without the proper tools or know-how could result in injuries or expensive damage to both the piano and your home. If you’re dealing with a large or valuable piano, or you’re feeling unsure, hiring professional movers is the safest way to ensure everything is handled and transported correctly.
How can I ensure my piano is properly adjusted and tuned after moving?
After relocating your piano, let it rest for 2 to 4 weeks before tuning. This waiting period gives the instrument time to adapt to its new surroundings, particularly if there are shifts in temperature or humidity. Jumping into tuning too soon could be counterproductive, as the wood and internal parts need time to settle.
After this adjustment phase, bring in a professional tuner to evaluate and fine-tune the piano. This ensures it’s aligned and produces the best sound in its new environment.
.svg)


