Moving can be stressful, but protecting your walls and floors doesn’t have to be. By preparing ahead of time, you can avoid costly damage to your home or apartment during the chaos of moving day. Here’s what you need to know:
- Identify Vulnerable Areas: High-traffic zones like hallways, entryways, and stairwells are prone to scratches, dents, and dirt. Corners, doorways, and stairs are also at risk.
- Use the Right Materials: Protect floors with Ram Board, carpet film, or heavy-duty mats. Safeguard walls with foam corner guards, moving blankets, or cardboard sheets. Furniture sliders and bubble wrap can prevent damage to both furniture and surfaces.
- Plan Ahead: Measure pathways, doorways, and tight spaces to ensure furniture fits without scraping walls. Clear obstacles and secure protective coverings with tape to keep everything in place.
- Special Tips for Apartments: Use stair runners, adhesive films, and foam padding for narrow spaces and shared areas. Divide moving tasks to minimize foot traffic and dirt.
- Post-Move Cleanup: Remove materials carefully to avoid residue, inspect for damage, and clean thoroughly.
A little preparation goes a long way. Whether you’re moving yourself or hiring professionals, taking these steps can save time, money, and stress.
Planning Your Protection Strategy
Setting up a solid protection plan starts with identifying vulnerable areas, gathering the right materials, and carefully measuring key routes. This preparation helps avoid unnecessary damage and ensures your move goes smoothly. Begin by pinpointing areas in your home that need extra attention.
Finding Areas That Need Protection
Take a walk through your current home and your new one to identify spots prone to damage during the move. High-traffic areas like hallways, entryways, and stairwells are especially at risk for floor scratches and scuffs caused by heavy foot traffic and movers carrying bulky items.
Don’t overlook corners of walls and doorways, which are prime targets for dings from furniture and moving equipment. Stairs, elevators, and shared building lobbies also need protection, especially in apartment complexes where common areas are shared with other residents. This walkthrough helps you decide what materials to use and where they’ll be most effective.
Different types of flooring come with their own challenges. Hardwood floors are prone to scratches from dragged furniture, while carpets can stain or tear from dirt and sharp edges. Tile floors may crack under heavy weight, and vinyl or laminate surfaces can dent if something heavy is dropped. Pay close attention to entryways, as dirt and debris tend to collect there, and many rental agreements require these areas to be left spotless.
Getting the Right Supplies
Once you’ve identified vulnerable spots, gather materials tailored to protect each surface. For hardwood floors, consider using Ram Board, drop cloths, or specialized runners. Carpeted areas can be shielded with plastic carpet film or carpet masking.
Walls and corners can be safeguarded with foam corner guards or padding to absorb impacts from furniture and equipment. To wrap furniture and prevent scratches or dents during transport, moving blankets, towels, or bubble wrap are excellent choices.
Furniture sliders are a must-have for moving heavy items without dragging them across the floor. These not only protect your flooring but also make the process less physically demanding.
For entryways, heavy-duty mats can help keep dirt and moisture at bay, especially in bad weather. If conditions are muddy or wet, shoe covers for movers can prevent messes. Use painter’s tape or moving tape to secure protective materials, but make sure to pick a type that won’t leave sticky residue behind.
Measuring High-Traffic Areas
To finalize your plan, measure high-traffic zones accurately. Measure doorways and pathways to ensure furniture can pass through without scraping walls or frames. This step also highlights tight spots where extra wall protection might be necessary.
Measure the length and width of areas that need protective coverings, adding a little extra to accommodate overlaps or unexpected needs. Clear the pathways of small furniture, decorations, or any obstacles that could trip movers or force them to take awkward detours. A clear and well-measured path makes it easier to lay down protection effectively.
Don’t forget to consider furniture height and ceiling clearance, especially around low-hanging fixtures or ceiling fans. These areas might need padding or temporary adjustments to prevent damage.
Finally, map out the moving route from each room to the exit, identifying the spots with the heaviest traffic. These areas will need the most durable protection, while spaces that movers pass through less frequently can get by with lighter coverings.
Protection Materials and Tools
When it comes to moving, having the right materials and tools is key to keeping your home and belongings safe. By choosing the appropriate protection materials, you can avoid costly damage and ensure a smoother process. Once you’ve mapped out high-traffic areas and identified vulnerable spots, it’s time to put these materials to work.
Floor Protection Materials
For hardwood floors, red rosin paper is a budget-friendly option at around $7.95 per roll. It creates a barrier against scratches and scuffs, though it’s not waterproof. If you’re dealing with areas prone to spills, opt for waterproof alternatives.
Products like Ram Board and X-Board are great for high-traffic zones. For instance, Trimaco X-Board Paint & Remodel costs about $39.97 and can handle heavy loads. These sturdy, corrugated cardboard options are ideal for hallways and main pathways where movers will tread repeatedly.
If your home has carpet, carpet film is a fantastic solution. This transparent, self-adhesive material protects against dirt, tears, and stains while peeling away cleanly after use. On tile and vinyl surfaces, self-adhesive floor runners provide extra grip for movers and protect against scratches and dents. These runners are especially handy on smooth surfaces where paper coverings might bunch up or slide.
For advanced durability, products like Armour Defender-Guard and Water Shield are worth considering. Armour Defender-Guard offers waterproof protection and superior durability, while Water Shield is twice as thick as kraft paper, making it a stronger alternative to red rosin or masking papers.
At entryways, protective mats serve a dual purpose: they trap dirt and moisture while cushioning the floor. Heavy-duty versions are tough enough to withstand dolly wheels and frequent foot traffic without shifting or wearing out.
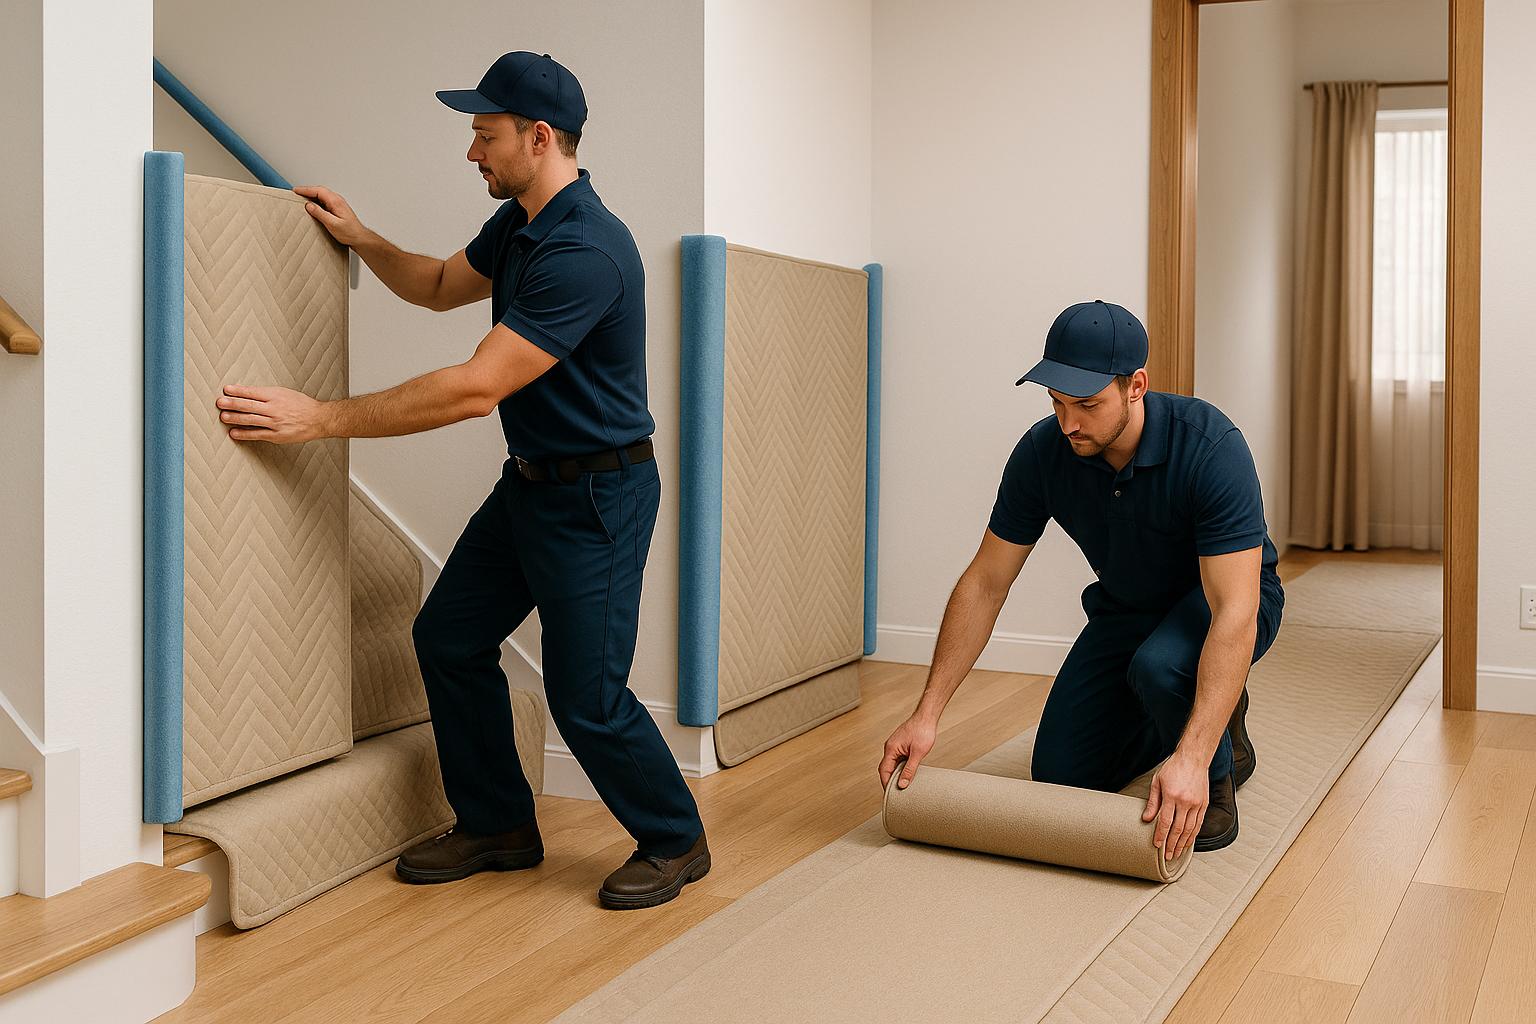
Wall Protection Materials
Walls often take a beating during a move, but there are plenty of materials to shield them from damage. Foam or plastic corner guards are an easy and affordable way to protect wall corners from dents and scrapes. These temporary guards can be placed at furniture height and removed without harming the paint.
For larger areas, moving blankets are a versatile option. Hang them in hallways or around doorways to create a cushioned barrier that absorbs impacts. Their thick padding helps prevent marks and holes caused by furniture bumps.
If you need to protect specific trouble spots, foam padding is a great choice. Cut it to size for areas like light switches, thermostats, or decorative wall elements, and secure it with painter’s tape to avoid leaving residue.
For narrow hallways or tight spaces, cardboard sheets offer an inexpensive solution. They’re easy to cut to size and provide decent protection against impacts. In areas with minimal risk, drop cloths can act as lightweight coverings to guard against scuff marks from light contact.
Furniture Sliders and Moving Blankets
Beyond static coverings, tools like furniture sliders and moving blankets make heavy lifting easier while protecting your home. Furniture sliders are a lifesaver when dealing with bulky items. By placing them under furniture legs or corners, you can glide heavy pieces across the floor with minimal effort and reduce the risk of scratches or dents.
Different sliders work better on different surfaces. Felt-bottom sliders are ideal for hardwood and tile, while plastic sliders perform well on carpet. If you’re moving across mixed surfaces, having both types on hand is a smart move.
Moving blankets are another essential tool. Not only do they protect furniture during transport, but they can also double as wall padding. For maximum protection, wrap furniture legs and sharp edges with bubble wrap or old towels before covering them with blankets. This combination helps safeguard both your furniture and your walls.
For delicate furniture components, bubble wrap is a must. Wrap table legs, chair arms, and any hardware that might scratch walls or other items. This extra layer of protection can save you from costly repairs or replacements.
Investing in high-quality tools is worth it, especially if you move often or have valuable items. Cheap sliders can crack under heavy loads, and thin blankets may not cushion adequately. Professional-grade materials may cost more upfront, but they offer peace of mind when handling your belongings.
How to Install Protection Materials
To ensure your protection strategy works effectively, it’s important to install protection materials with care. Proper preparation and strategic placement can help you avoid damage and save on costly repairs.
Protecting Entry and Exit Points
Entryways, especially the front door, experience the most wear and tear during a move. These high-traffic areas need extra attention. Start by placing door jamb protector pads along the moldings of entryways. This creates a safe, damage-free passage for movers and heavy items.
"A door jamb will be placed on your front door to keep the doorway propped open to allow easy and safe entry and exit into your home." – Professional Movers.com
To protect flooring near entry points, use neoprene floor runners. These are rolled into place along high-traffic paths to shield floors and provide better footing for movers.
"Neoprene floor runners will be rolled into position to cover all traffic lanes where our movers will be walking…to protect your floors and improve our movers footing while carrying heavy items." – Professional Movers.com
If you’re moving during wet or snowy weather, consider adding Carpet Shield, a self-adhesive film, over carpeted areas near entrances. This waterproof layer prevents moisture and mud from soaking into the carpet fibers.
Once entryways are secure, you can move on to protecting the rest of your floors.
Installing Floor Coverings
Before laying down any floor protection, make sure your floors are clean. Sweep or vacuum thoroughly to remove dirt and debris. Then, measure high-traffic areas like hallways and main pathways to determine how much covering material you’ll need.
The type of floor covering you choose depends on the flooring:
- Hardwood floors: Use Ram Board for heavy-duty protection.
- Tile surfaces: X-Board works well as a sturdy barrier for furniture and equipment.
- Carpeted areas: Carpet film is a reliable option. Simply unroll it over the carpet and step on it to activate its adhesive backing. It sticks to the carpet fibers and peels away cleanly when removed.
For paper-based coverings like red rosin paper, secure the edges with blue painter’s tape to prevent sliding. Pay extra attention to seams where sheets overlap, as these areas can bunch up underfoot. Tape down every few feet in high-traffic zones to keep everything in place.
If you’re covering stairs, apply the material to each step and riser, ensuring it adheres firmly.
Once the floors are protected, focus on safeguarding the walls.
Installing Wall Guards
To install wall protection, start by cleaning the wall surface with a solvent to remove dirt, grease, or oil. Let the wall dry completely, as moisture can interfere with adhesion.
For adhesive corner guards, apply a heavy-duty adhesive in a zig-zag pattern on both sides of the guard. Press it firmly against the wall to secure it.
If you prefer a screw-in method for a more permanent solution, position the corner guard where you want it and mark the mounting holes with a pencil. Drill pilot holes at these spots, clean away any dust, and attach the guard using screws provided with the kit.
For aluminum retainer systems, measure and cut the retainer to the required length, factoring in end caps. Use a level or chalk line to mark the installation height for consistent placement. Locate wall studs and transfer their positions to the retainer for secure mounting.
Pre-drill holes in the aluminum retainer, alternating between top and bottom positions, and keep fasteners no more than 16 inches apart. Align the retainer with the wall, mark the hole locations, and drill into the drywall. If you’re not hitting studs, install drywall anchors before securing the retainer with fasteners.
Keep any protective film on stainless steel or aluminum guards until the adhesive has fully set. This prevents scratches during installation. Only remove the film once the installation is complete.
sbb-itb-a5538b6
Apartment Move Protection Tips
Moving out of an apartment brings its own set of hurdles, especially when dealing with narrow hallways, tight staircases, and shared spaces. These tips focus on tackling those challenges while keeping your belongings and apartment in good shape.
Protecting Stairs and Narrow Spaces
Stairs are one of the most damage-prone areas during a move. To safeguard them, cover each step with protective materials like stair runners, non-slip covers, or plastic film. For carpeted stairs, adhesive carpet film is a great choice – it keeps dirt, stains, and moisture at bay while maintaining traction for movers.
Make sure all coverings are securely fastened to prevent them from shifting during the move. Pay extra attention to stair edges, which are especially prone to damage. Stair edge protectors can add an extra layer of safety when moving heavy items.
In narrow hallways, flexible materials like carpet film can protect walls and floors without creating tripping hazards. Measure the hallway width carefully to ensure a snug fit. To minimize wall damage, disassemble furniture when possible, and use furniture dollies with rubber wheels. These wheels not only prevent scratches but also reduce noise – an important consideration in shared living spaces.
For corners and door frames, foam padding can act as a soft barrier, shielding these areas from dings and scratches as large items are maneuvered through tight spaces.
Managing Foot Traffic
Foot traffic during a move can quickly wear down floors and spread dirt. To control this, divide your moving crew into indoor and outdoor teams. Place heavy-duty doormats at exits, encourage everyone to wipe their feet, and keep shoe covers handy for movers and helpers.
If it’s raining or snowing, lay down non-slip mats at entrances to catch water and debris before it spreads throughout your apartment. For added floor protection, use runners made from neoprene or heavy-duty plastic to create safe pathways along high-traffic areas like hallways and entryways.
In common areas where extra care is required, adhesive carpet film can shield carpet fibers from dirt and damage. For hardwood or tile floors, consider Masonite boards or specialized hard floor protectors to prevent scratches and distribute weight evenly.
Set up all protective materials just before movers arrive to avoid dust buildup that could scratch your floors. With these strategies, you can navigate the unique challenges of apartment moves while keeping your space and belongings in excellent condition.
Cleanup and Final Inspection
Once the move is over, taking down protective materials is just as important as putting them up properly. If not removed carefully, these materials can leave sticky residue, damage surfaces, or undo all the effort you put into preparation. Removing them thoughtfully and inspecting your space ensures everything stays in good shape.
Removing Protective Materials
Start with adhesive-based materials, as they become harder to remove the longer they stay in place. For instance, Plasticover® Brand Carpet Protection Film is designed for up to 60 days of use. Taking it off soon after the move – ideally within a few days – can help avoid adhesive buildup. To remove it, peel slowly from a corner at a 45° angle. If any sticky residue is left behind, use a citrus-based adhesive remover, but always test it on a small area first.
When removing wall protection, take your time and check for residue as you go. Prompt removal not only prevents buildup but also protects the surfaces you worked so hard to safeguard.
After everything is taken down, do a thorough inspection of your space for any signs of damage.
Checking for Damage
With protective coverings gone, it’s time to carefully check for damage. Use bright lighting – or a flashlight – to spot any hidden issues. Pay close attention to high-traffic areas like doorways, stairs, and narrow hallways where heavy furniture or equipment might have caused wear.
Look for scuffs, scratches, or cracks on floors, walls, and ceilings, which could hint at structural stress. Watch for wet spots or damp areas that might indicate leaks, and examine walls for bulges, cracks near windows, or gaps where walls meet ceilings. Don’t forget to check for loose or damaged tiles, trip hazards, and water damage. Walk across floorboards to listen for creaks or shifts that weren’t there before.
If you notice any damage, take photos. This is especially important if you’re renting and need to report concerns to your landlord or the moving company.
Final Cleaning Steps
Once the inspection is done, it’s time to clean. Start by vacuuming walls to remove dust from the move, and follow up with a damp cloth to wipe them down.
Vacuum the floors thoroughly, then mop using hot water mixed with a 2:1 water-to-vinegar solution for general cleaning. For hardwood floors, use a nearly dry mop first, then clean with lightly soapy water, ensuring the floor dries completely between steps. For stubborn dirt or scuff marks, hand-scrub problem areas.
Don’t forget overlooked spots like the tops of doors and windows, light switches, and baseboards, which often collect dust during a move. Finally, recycle your packing materials and do a walkthrough to make sure your space looks just as good – or even better – than it did before the move.
Conclusion: Protecting Your Home During Your Move
Taking steps to protect your walls and floors can save you from unexpected repair costs and cut down on cleanup time. Here’s a compelling fact: every square foot of surface protection saves over $6 in repair expenses, and using temporary protection can reduce post-move cleanup time by nearly half.
"For every square foot protected, there is an average saving of over $6 in damage deficiencies, which means that the cost of protective materials is quickly justified through the prevention of damage-related expenses."
- Axiom Temporary Surface Protection
Preparation is the foundation of effective protection. Start by carefully assessing both your current home and your new one to identify areas that are most at risk. Use the right materials for each surface: red rosin paper or floor shields for floors, corner guards or door jamb protectors for walls, and furniture sliders with rubber wheels to ensure safe transport. Make sure coverings are securely in place and control foot traffic to keep dirt and moisture to a minimum. These simple but important steps can make a big difference.
While DIY protection can work well if done correctly, professional movers bring expertise that can be especially valuable in navigating tight spaces or tricky layouts.
If you’re moving in Charlotte, Charleston, or Greenville, Two Twigs Moving offers full-service moving solutions, including expert wall and floor protection. Their customizable packages cover everything from furniture disassembly to delicate item handling, giving you peace of mind and ensuring your home stays damage-free from start to finish.
FAQs
What are the best materials to protect hardwood floors during a move?
To protect your hardwood floors during a move, try using felt pads, floor runners, Ram Board, rosin paper, or furniture coasters. These materials act as a shield against scratches, dents, and scuffs that heavy furniture or equipment can cause.
For extra care, make sure to pad all furniture legs and lift items instead of dragging them across the floor. These simple steps can go a long way in keeping your hardwood floors looking flawless during the move.
What’s the best way to remove protective materials without leaving residue or causing damage?
When tackling residue or stubborn spots, begin with gentle methods. A mix of warm water and mild soap is often enough for simple cleaning. For more persistent areas, everyday items like white vinegar, lemon oil, or mineral oil can do the trick. If the residue remains, gently rub the area with a soft cloth and a bit of isopropyl alcohol. For extra-stubborn spots, a steam cleaner can offer a deeper clean.
Tip: Always test your chosen solution on a small, hidden area first to make sure it won’t cause any damage.
How can I protect narrow hallways and shared spaces in an apartment building during a move?
To keep narrow hallways and shared spaces safe during your move, start by wrapping furniture and bulky items with moving blankets or bubble wrap to protect them from scrapes and dents. Add corner protectors to walls and door frames to guard against accidental bumps. For floors, consider using non-slip coverings like cardboard or plastic runners to prevent scratches and dirt.
Clear all pathways of clutter to create a smooth route for moving items, and touch base with neighbors to coordinate the use of shared spaces and avoid disruptions. Clearly label your boxes and belongings to stay organized and ensure everything goes smoothly without unnecessary damage.
.svg)


